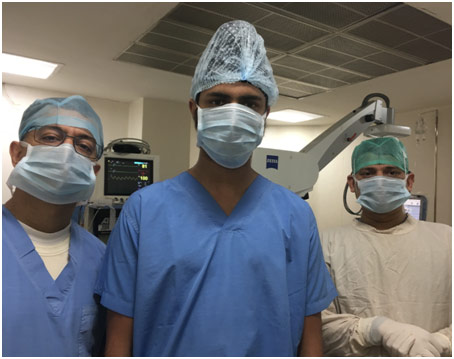
Dr. Gaurav Kakkar is an ophthalmic surgery, practicing at the Eye7 Care Clinic in New Delhi, India. He did his medical school and residency at Kasturba Medical College in Manipal, India, and he chose to go into ophthalmology specifically since he was fascinated with the eye because it is a such a unique organ that requires such precise care. I was able to shadow him and his fellow surgeons in the OR, standing beside them as they performed surgeries like an endoscopic DCR, trabeculectomy with MMC, silicone oil removal, pterygium excision with conjunctival autograft, phacoemulsification with IOL implantation, and SBK LASIK. It was a remarkable experience to witness such a variety of surgeries under the hands of such talented surgeons and learn so much about ophthalmology.
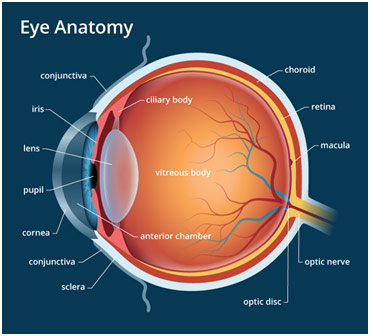
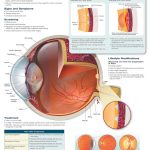
Anatomy of the Eye
Tears generally drain through the nose, but if the tear duct is blocked, a separate opening must be made. An endoscopic DCR (dacryocystorhinostomy) is used to treat patients with this lacrimal sac or nasolacrimal duct obstruction with the help of an endoscope (an instrument with a camera) through the nose. The surgeon made a 10-15 mm opening in the nasal mucous membrane above the maxilla. During this process, the surgeon made a point of putting the endoscope repeatedly into an antiseptic solution known as savlon to prevent fogging of the endoscope because of humidity and the patient’s breath. The lower ⅓ of the lacrimal bone was then removed through punching with the Kerrison punch, but the rest of the bone needed to be shaved off with a rotator diamond-tipped drill since it was too thick to punch out. The surgeon informed me that the bone dust would be washed out with normal secretions as well as picked up by the surgical gauze that he placed. As soon as the lacrimal sac—where the tear duct reservoir is trapped—and the upper nasolacrimal duct were exposed, the surgeon then switched to working on the eye. He made a small opening in the eyelid and put the Bowman’s probe through it so that could be seen pushing on the lacrimal sac with the endoscope. The purpose of the Bowman’s probe was to ensure that the canaliculi, the narrow channels from the eye to the lacrimal sac, were not blocked as well. He then made a book-like opening in the lacrimal sac, allowing the trapped fluid to drain out into the nose. While the surgeon did not do so for this case, he told me how he sometimes puts a silicon tube in to keep the passage patent before removing it after 4-6 weeks. Additionally, he also sometimes uses mitomycin C (MMC), an antifibrotic agent that inhibits the extra growth of tissues, to keep the passage patent for longer.
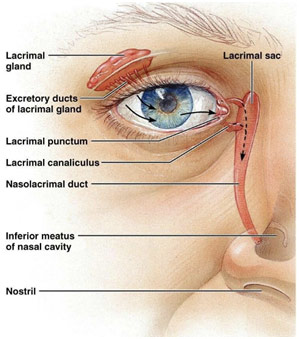
Lacrimal System Anatomy
Another surgery I saw with Dr. Kakkar was a trabeculectomy with MMC, surgery for glaucoma filtration. The goal is to create a window above the eye so that the extra fluid can come out, normalizing the increased intraocular pressure. Normal intraocular pressure is 21 mm Hg, but in the acute case that I saw, the eye pressure was 49 mm Hg, drastically increasing the risk of optic nerve damage that could lead to blindness. After using an 8-0 stay suture to anchor the eye to expose the superior portion of the eye, the surgeon made an opening in the conjunctiva (peritomy) while cauterizing the surface blood vessels that began to bleed. Then, the surgeon made a triangle opening in the sclera with a scalpel and a crescent knife before lifting the flap. The surgeon then made a rectangular opening in the trabecular meshwork with a very fine blade. Through this trabeculectomy, a piece of the iris popped out, so the surgeon cut that out in an iridectomy so that the iris would not close this opening from the inside. MMC was put between the triangular flap and the sclera to prevent scarring. The sclera was then closed with 10-0 vicryl sutures, but the tightness was limited in a process known as titration where the surgeon tried to determine the perfect tightness that would allow for just enough aqueous humor to drain out through the sides of the triangular flap. Once more, MMC was put on the sclera to prevent scarring. The conjunctiva was then pulled and sutured over the triangular flap. Some air was also put in to prevent losing the structure of the anterior chamber. Immediately post-op, the aqueous humor starts draining out really fast, drastically reducing the pressure of the anterior chamber. Putting air slows down the drainage until, after 24 hours after the surgery, the drainage and production equalize. This now allows another opening for the fluid to exit the anterior chamber through the subconjunctival opening and into a pool called a bleb before it is reabsorbed by the body.
In the case I saw, the cause of the glaucoma was a swollen cataract that led to the anatomical blockage of the trabecular meshwork (drain through which aqueous humor flows out of the eye) so the cataract was subsequently removed. This glaucoma was thus closed-angle glaucoma as contrasted with open-angle glaucoma, which does not involve the anatomical blockage of the trabecular meshwork since the angle between the cornea and iris is “open.” Instead, the trabecular meshwork is slowly clogged over time. This case was unique since closed-angle glaucoma is relatively rare, and, more so, trabeculectomies are usually only done for open-angle glaucoma. The case was also interesting as the trabeculectomy surgery was combined with phacoemulsification of the cataract. Another unique aspect of the case was that the patient was Hepatitis B positive, so “universal precaution” was required, meaning that the surgical team had to double their gloves, double their drapes, and wear foot covers.
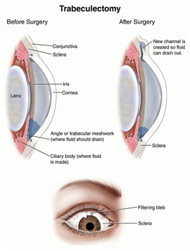
Anatomy Before and After Trabeculectomy
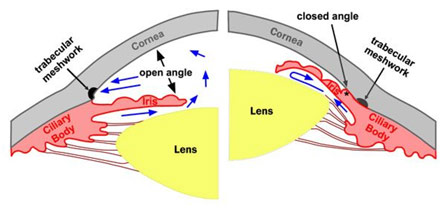
Open Angle vs. Closed Angle Glaucoma
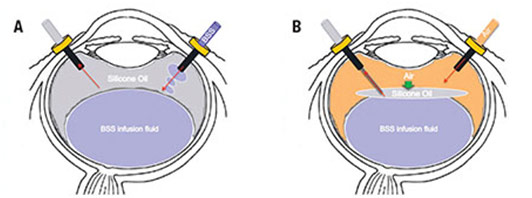
One minor retinal surgery I saw was silicone oil removal for a patient who had a retinal detachment. Following the retinal detachment surgery, silicone oil was put inside the eye to put pressure to keep the retina attached in place since the vitreous humor had to be removed. However, now after three months, the silicone oil had completed its function and had to be removed since the oil was beginning to emulsify and create bubbles. The surgeon created three ports to insert his instruments into the eye before putting an end light through the pupil to focus light on the retina for visualization. He then put a tool into one of the ports that put in BSS (basic salt solution) saline so that the silicone oil is passively drained out through the other two-port. After about 20 minutes, the viscosity of the liquid coming out of the port made it clear that only saline was coming out now. The surgeon looked at the retina with the end light to ensure there was no silicone oil left. The surgeon then did a fluid-gas exchange where the saline was replaced with air to be able to determine if the ports have sealed or leaking when the surgeon removes his instruments. The gas would be reabsorbed by the body and replaced with aqueous humor, not vitreous humor, which cannot be remade by the body. The ports are designed to be self-sealing with saline, and if the ports continued to leak gas, which did not happen in this case, the surgeon would have used 8-0 very suture to close the incisions.
Silicone Oil Removal Surgery
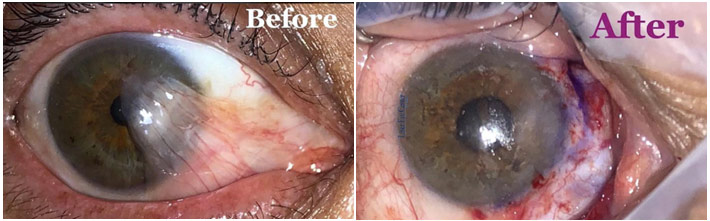
One of the corneal surgeries I saw was a pterygium excision with conjunctival autograft. A pterygium is a benign growth of triangular tissue onto the eye from the nasal side usually due to UV radiation. The anesthesia given was peribulbar anesthesia, unlike for most other surgeries I saw, which saw anesthesia inject around the eye. Retrobulbar anesthesia, from behind the eye, could also be done, but there is an increased risk of akinesia, no movement, due to optic nerve damage. The surgeon began dissecting the pterygium off with a crescent knife and forceps. He then began to excise some conjunctiva from the other side of the eye, making it with a purple marker to help differentiate the top from the underside and the limbal side from the non-limbal side so that the autograft can be placed correctly. This excision does not present a problem since the conjunctiva that the surgeon takes will readily re-epithelialize (grow back), unlike the area where the pterygium was excised from. This autograft is then sutured into the place where the pterygium was excised with 10-0 nylon suture. Only 4 sutures were put in because the blood present will clot and stabilize the graft. Sometimes, the patient has irritation in the eye, so a BCL (bandage contact lens) was put on the patient.
Before vs. After Pterygium Excision with Conjunctival Autograft
A cataract is the clouding of a lens that causes blurry vision. The basis of nearly every cataract surgery is to remove the cloudy lens and replace it with an artificial one. One common type of cataract surgery is a phacoemulsification with intraocular lens (IOL) implantation, which seeks to break up the lens using ultrasonic waves. Epinephrine eye drops are given to keep the pupil dilated for the surgery before topical anesthesia and antiseptic are given. Then, two 1 mm entry ports were made to allow the entrance of the surgical instruments that would allow for infusion and aspiration. Before trypan blue dye was put in to allow for better visualization of the capsular bag, the surgeon put an air bubble to keep the anterior chamber dry so that the stain would work. Putting the dye is technically optional, but Dr. Kakkar always put it in. After waiting for about 30 seconds, saline was used to remove both the air and the dye. Viscoelastic was then inserted in the anterior chamber to stabilize the eye structure and pressure while also working to protect the cornea from irritation. Then, the surgeon made a 2.2 mm opening to insert the phaco probe that gave BSS, aspirated the liquid, and released ultrasonic waves based on pressure on a foot pedal. After making a 5.5-6 mm diameter continuous curvilinear capsulorhexis (CCC) opening in the capsular bag (where the cataract is located), the surgeon used the phaco probe to add BSS to free the nucleus of the cataract so that it could rotate freely (hydro dissection). As soon as he did that, the ultrasound waves were used to break the cataract into pieces while the BSS helped emulsify it so that the aspirator could remove it from the eye. For removal of the finer cortical matter of the lens, the phaco probe was substituted for a bimanual irrigation and aspiration tool. The surgeon then put viscoelastic into the now empty bag to create space right before he inserted the IOL. The 10 mm IOL was inserted through the main 2.2 mm incision since it unfolded only once it was in the capsular bag. The viscoelastic was then replaced with BSS, which has a very close composition to the aqueous humor, to help seal the incisions from the hydro pressure, so no sutures are needed to close up. An antibiotic eye drop was then given preemptively.
During one phacoemulsification with IOL implantation, I saw a posterior capsular rent complication where, because the capsule was weak, the nucleus fell into the posterior part of the eye. Not only does this make removing the lens harder but also it requires a vitrectomy with a rotary cutter to get rid of the vitreous humor in the anterior chamber because it can cause corneal decompensation where the cornea becomes weak and fragile if the vitreous humor is not removed. However, the emulsification of the cataract is no different except that it is done in the posterior chamber. Because the capsule broke, a sclera fixated IOL was put in where the lens was suspended like a hammock with the help of 9-0 prolene sutures.
Mature Cataract
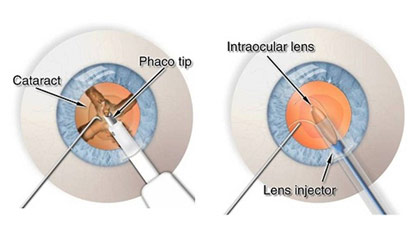
Phacoemulsification with IOL Implantation Steps
LASIK surgery is a common surgery to help correct people’s vision based on changing the shape of the cornea. LASIK can be done with a microkeratome blade or bladeless with a femtosecond laser to create the corneal flap. The former, SBK (sub-Bowman’s keratomileusis) LASIK, is the one I specifically saw and is slightly less precise than the Femto-LASIK. SBK actually creates a slightly bigger flap in the cornea, thus leaving less residual stroma (corneal thickness). After administering anesthetic eye drops, the corneal flap was made with a circular ring and microkeratome blade after the flap was marked to allow for orientation in the rare case that the flap was cut off. After pulling the flap aside, a laser was put in the center of the pupil, inputting and confirming the correction tested for earlier on the machine. The laser then went on to burn the corneal protein of collagen in about 10 seconds. As soon as the machine alerted the surgeon that this was finished, the surgeon washed away the debris and residual particles with saline. After this initial washing, the surgeon checked again to ensure there was no particular debris remaining before the flap was closed. As soon as this was done, the region was dried up and the surgeon waited two minutes for the corneal flap to self-seal. The surgeon then did the same procedure for the other eye.
For myopia or nearsightedness, the light focuses before it hits the retina, rendering a blurry image. Shortening the eye would solve this problem; however, this is unrealistic. What is realistic is to change the surface of the cornea so that it focuses light on the retina from thereon. For myopia, this means flattening the central cornea. For hyperopia or far-sightedness, the light focuses after it hits the retina, again rendering a blurry image. Lengthening the eye would solve this problem; however, this is unrealistic. For hyperopia, what is realistic is flattening the peripheral cornea.
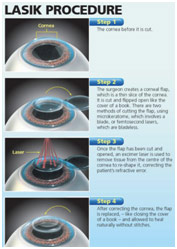
LASIK Procedure Steps
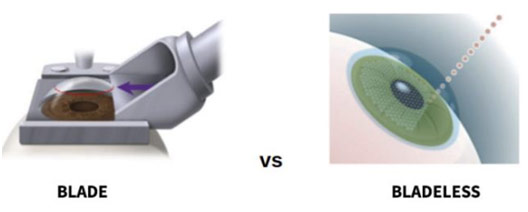
Blade vs. Bladeless LASIK
This experience was superb because ophthalmic surgery is really like nothing I have ever seen before. Nearly all of it is done with a microscope as the work is so fine and precise, requiring such a steady hand and such intense focus. I was fortunate enough to see such a variety of surgery as well from corneal surgeries to retinal surgeries, from surgeries for glaucoma to surgeries for cataracts. The surgeons like Dr. Gaurav Kakkar, Dr. Pawan Gupta, Dr. Saurabh Kamal, and Dr. Ramendra Bakshi were all extremely kind and answered all my questions patiently while they masterfully performed their ophthalmic surgeries. This was an enormous privilege to be able to shadow at the Eye7 Care Clinic, and I enjoyed every second of my experience.
References
Bagi, Stephen. Human Eye Anatomy. All About Vision, www.allaboutvision.com/resources/anatomy.htm. Accessed 26 Dec. 2018.
Before and After Pterygium Excision Surgery. Instagram, www.instagram.com/p/BpeuKgBHBKp/. Accessed 26 Dec. 2018.
Blade Vs. Bladeless LASIK Surgery. 7 Jan. 2017. EB Eye Clinic, www.webeyeclinic.com/Articles/61419/Lasik-Procedure/Blade-VS-Bladeless-Lasik-Surgery. Accessed 26 Dec. 2018.
Kaster, Krystal. Lacrimal Gland Anatomy. Pinterest, www.pinterest.com/pin/525654587738994609/?lp=true. Accessed 26 Dec. 2018.
LASIK Procedure. Bingham Family Vision, www.binghamfamilyvision.com/eyecare-services/lasik-eye-surgery/. Accessed 26 Dec. 2018.
Open Vs. Closed Angle Glaucoma. Stewards, www.stepwards.com/?page_id=6616. Accessed 26 Dec. 2018.
Phacoemulsification Cataract Surgery. Vision and Eye Health, www.vision-and-eye-health.com/cataractsurgery-steps.html. Accessed 26 Dec. 2018.
Silicone Oil Removal. Retina Specialist, www.retina-specialist.com/article/soup-and-sandwich-silicone-oil-removal. Accessed 26 Dec. 2018.
Trabeculectomy. Manhattan Eye Specialists, www.eyedoctorophthalmologistnyc.com/procedures/glaucoma-trabeculectomy-surgery/. Accessed 26 Dec. 2018.


Thanks for covering this subject. Do you intend to continue?